Maui: The Best Island To Visit In Hawaii

Hawaii is home to some of the world’s best natural beauty from its waters to vegetation to its sandy beaches. There are at least 20 islands in Hawaii with 8 main ones. They include Hawaii-the big island, Oahu, Maui, Kauai, Molokai, Lanai, Niihau, and Kahoolawe.

Maui is the second-largest island of Hawaii’s main islands. Nicknamed the Valley Isle, Maui is definitely the best island to visit in Hawaii. It consists of some of the best beaches in the world. Its got a beach for every mood.

The beaches offer big surfable waves, hidden gems, and wind for kiteboarding. Winter months offer spectacular sights for whale watching. You can also spot turtles on beach shores. These beaches offer a chance for you to see and interact with wildlife.

You can wake up early to spot sunrise at Haleakala. Strolling through the historic town of Lahaina gives you a chance to dine and shop all day long. You can also indulge in whale watching.

Maui is a great foodie destination. Restaurants around the island serve foods from all around the world. You can also have a taste of the local cuisine while here. The Ululani’s Hawaiian shave ice is a must-have. It’s a drink made by Ululani that has over 50 different flavors.

Hiking within the island of Maui follows trails that run into lofty ridgetops, bamboo forests, waterfalls and through the volcanic Haleakala National Park. This park is home to Maui’s highest peak.

The Hana Highway offers spectacular scenery as you drive. The Road to Hana is a 65-mile stretch of road that is famous for its twists and turns, and beautiful scenery as you head to Hana. It’s ideal for a road trip.

If you bring a car, make sure to do research or save a contact number of a vehicle towing service in case you have a car problem that need to tow.

The island of Maui is definitely the best in Hawaii. You can engage in so many things while here. A visit to this island will surely be one that you’ll never forget.…

New Kid On The Block – The ‘Beyond Diet’ Online Program

INTRODUCTION

The Beyond Diet Program is a membership program that was started 10 years back by fitness and nutrition coach Isabel De Los Rios and Jeff Siegel. Both of them are also authors of multiple successful fitness books.

The Beyond Diet Program requires a onetime payment and a lifetime membership, which is much more affordable than the usual diet plans that require a monthly fee.

According to many beyond diet reviews, the online diet program works on the following basic principles:

  1. Every person is fundamentally different and requires a different type of weight loss structure.
  2. Both diet and exercise are an integral part of the weight loss process, although the beyond diet program can do with little exercise as well.
  3. It is always better to be in contact with people who are trying to lose weight, i.e. are in the same boat as you and hence understand your situation.
  4. A weight loss program should be easy to stick to and hence shouldn’t make you sacrifice all the good tasting food.

The beyond diet program essentially regulates one’s eating habits, the time frame in which to eat and the type of food one eats. It hence does not advocate starvation, but believes in healthy eating.

beyond diet new program

On the face of it this should thus be a harmless way of losing weight without compromising on individual health.

In the next few sections of this article we will try to determine whether Beyond Diet is actually as healthy as it claims to be.

BASIC SHORTCOMINGS OF THE DIET PROGRAM

The popular review of the diet program reveals two basic shortfalls in the process –

There is no prescribed workout regime or exercise to complement the program. The package is a food-only thing and does not include any workout tips or guidelines. The workout packet has to be purchased separately.

Now it is common knowledge as well as proven by a big research study that a program involving both diet and workout will give much better results than one with just a diet plan. A buyer thus expects certain basic guidelines if not detailed instructions as to the workout regime, but there is absolutely no workout guide whatsoever.

The Beyond Diet program is also not of much help in cases where the people might slip into binge eating or give in to bouts of cravings.

Although it is an accepted fact that no amount of diet plans can work unless the person exercises self-constraint, but a certain deterrent or remedy is always welcome in the diet program that one is following.

GENERAL VIEWS OF THE PEOPLE USING THE PRODUCT

There is speculation in the market that this name, Beyond Diet, was actually the name of a book written by one Martin Katanh of Vanderbilt, which had proved to be an excellent guide to weight loss with numerous success stories mushrooming every day.

Thus a lot of people enrolled for the current program assuming that it was in continuation of or modelled on or related to the book. However, there is apparently no connection between the two.

The Beyond Diet Program has received mixed reviews online, with a few people singing praises of the product, while the others consider it useless and a waste of time and money.

One thing that is common among most reviews is that the diet is a basic compilation of most of the tips about dieting that are available online in or in other books, albeit in a scattered manner.

It is thus possible that if you spend a little extra time combing through diet books and internet articles, you may be able to get all the information without having to pay the fee.

A lot of people have also voiced complaints of how the Beyond Diet newsletters and videos as well as the website is designed in a way that they keep pushing forward new products of their own and most of these members are billed by default for all of these products, making the cost of the program much higher than originally advertised.

A few people have also termed it to be a scam in that they charge you a nominal fee to gain entry and provide you with generic information and then keep you motivated to push forward and to gain markets for their products.

A multitude of members have also registered login problems on the website which prevents them from accessing their instructions and program details, and a lot of new people are put off by the idea and hence do not want to invest in the program.

However, there are a few avid supporters of the program who swear by the diet program and claim to have seen tremendously positive results from following the diet.

These people are extremely happy with the way the diet has shaped their weight loss efforts and are mostly impresses with the fact that they were able to shed pounds in a healthy manner just by regulating their diets and without any physical workouts.

A lot of people were also impressed by the fact that Beyond Diet does not prescribe any massive changes that may take time getting used to, or may prove too difficult to do.

The program, rather, is more about making little changes every day to ensure maximum weight loss, without causing much of an upheaval in the lives of their members.

CONCLUSION

The presence of positive online reviews is proof of the fact that not all is wrong with the diet program and hence there is no point out-rightly rejecting it.

Instead a lot of the consumer problems are website related and the diet program creators will benefit immensely by fixing the login problems with their website, and by peddling their products a little less, while giving the customers the option to purchase the products instead of billing them by default.

Since the Beyond Diet Program is not a multi-level marketing (MLM) scheme, the positive reviews also have an air of credibility around them since none of the people will be benefitted by more and more people entering the program, or buying the product off them.

 …

gingerbread spice caramels

baked with love2012
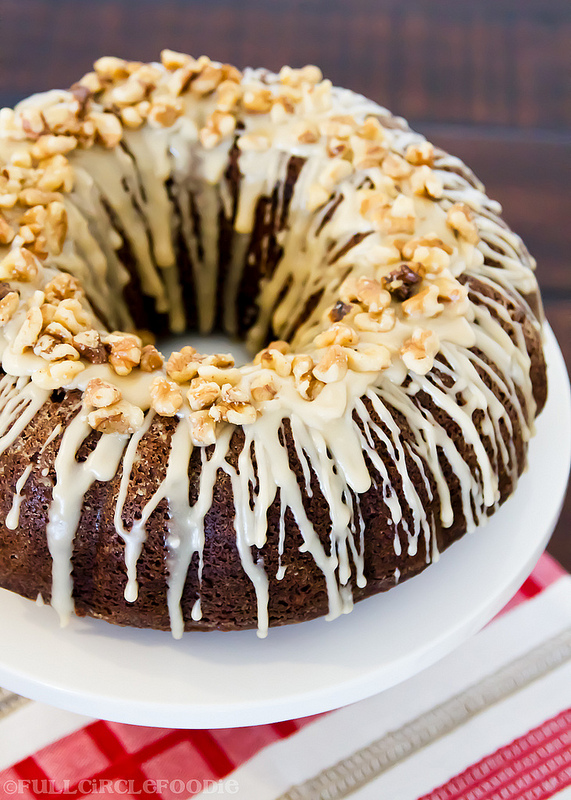
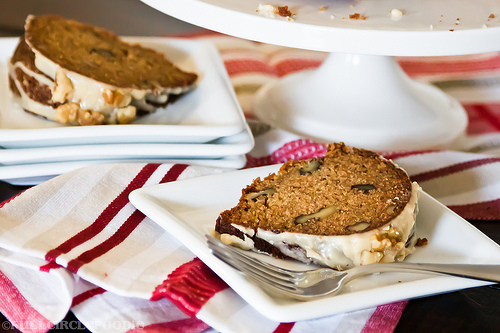
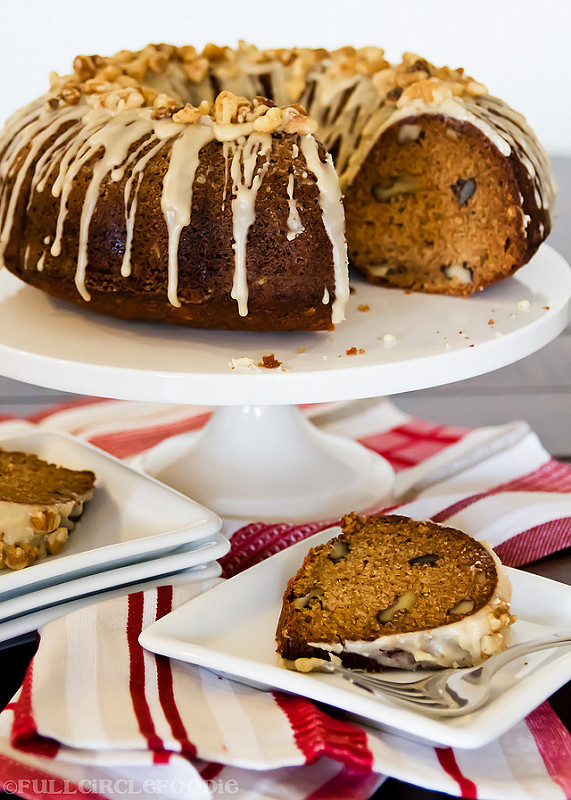
If you haven’t spent the holidays with Full Circle Foodie before, I’d like to extend a warm welcome. This is my fifth year executing my “Baked with Love” project where I bake a variety of cookies and candies and then package them up all pretty to give, with love, to coworkers, friends, and family. 

Each year, I incorporate tried and true traditions as well as new recipes that I am equally excited about. Grab some hot cocoa and enjoy your stay as my 2012 Box of Love unfolds before your eyes! 

Gingerbread Spice Caramels
After discovering how easy it was to make caramels, I got hooked and wanted to try new flavors. My next adventure included gingerbread caramels and they turned out to be a huge hit. The buttery caramels paired with the molasses and gingerbread spices were the perfect holiday indulgence.
Gingerbread Spice Caramels
Ingredients:

2 cups heavy cream
1 cup light corn syrup
2 cups granulated sugar
6 tablespoons unsalted butter, cut into small pieces
1/4 cup unsulfured molasses
1/2 teaspoon pure vanilla extract
1/4 teaspoon salt
1 teaspoon ground cinnamon
3/4 teaspoon ground ginger
3/4 teaspoon freshly grated nutmeg
1/4 teaspoon ground cloves
Vegetable-oil cooking spray

Preparation:

  1. Prepare a 9×13″ cake pan with a light coating of cooking spray followed by a layer of parchment paper. Make sure parchment covers bottom and all sides; two overlapping pieces forming a cross work well.
  2. In a large, heavy pot over high heat bring heavy cream, corn syrup and sugar, butter and molasses to a boil. Stir continuously and cook until caramel temperature reads 248 degrees Fahrenheit, approximately 20 minutes.
  3. Remove from heat and carefully stir in vanilla, butter and spices. Take caution as caramel will violently bubble when vanilla is added.
  4. Immediately pour caramel into prepared pan. Do not scrape the bottom of the pot into the pan. Cover and let stand at room temperature for at least 24 hours before cutting.
  5. Invert caramel onto a cutting board lined with a piece of parchment paper. Carefully peel original parchment paper off of the caramel and cut into desired size with a large sharp knife. Wrap in 4×4 inch candy foil or wax paper. Store in an airtight container.
Gingerbread Spice Caramels
Reminder: Don’t forget to clean your hands before you touch food or anything in the kitchen. Don’t also forget to clean your kitchen before and after you use it. If you have a grease trap in the kitchen, clean it regularly and it is best to handle it from a grease interceptor cleaning service.

picnic cake

Picnic Cake

When it comes to my love of baking, my mother has always been my biggest influencer. She has been icing rolled sugar cookies long before it was the cool thing to do; I can actually still taste the strawberry ice cream cone cookies that she made for my elementary school birthday celebrations. Her advanced candy making skills are also impressive and evident in her dark chocolate almond caramels, a treat she hesitates to make due to all of the cutting and wrapping of each individual piece. Although as her one and only, it doesn’t take too much convincing to get at batch out of her around the holidays.
My favorite thing about her her years of culinary wisdom are the emails that we shoot back and forth to bounce recipe ideas off of each other. She always knows exactly what to make for each occasion and hopefully, myself for her. This Picnic Cake resulted from a string of emails that started in attempt to find the perfect item for a brunch-time bake sale for a local hospital. Mom recalled picking up pieces from Austin’s own Texas French Bread many years back and said that it was always a favorite of hers.

Picnic Cake

Although no longer on the Texas French Bread menu, this cake was so easy to bake at home that there’s no reason not to give it a try. Its bold flavors hold up nicely with a cup of coffee for breakfast or brunch, but is light enough to be a lovely pairing with afternoon tea. I could see this being a huge hit to accompany early morning meetings at the office as well.
Picnic Cake
makes approximately 16 servings
 
Cake Ingredients:
2 cups all-purpose flour
1 cup finely crushed graham crackers
1 cup packed brown sugar
1/2 cup sugar
1 teaspoon baking powder
1 teaspoon baking soda
1 teaspoon salt
1/2 teaspoon ground cinnamon
1 cup butter, softened
1 cup orange juice
1 tablespoon grated orange peel
3 large eggs
1 cup chopped walnutsFrosting Ingredients:
2 tablespoons brown sugar
5 teaspoons milk
1 tablespoon butter
3/4 cup powdered sugar
additional chopped walnuts for decorationPreparation:
  1. Preheat oven to 350 degrees Fahrenheit. Prepare 12-Cup Bundt Pan with butter and a light coating of flour. Tap out excess flour and set aside.
  2. Mix all cake ingredients except walnuts in stand mixer on medium speed until smooth. Fold in walnuts and transfer batter to prepared bundt pan.
  3. Bake for 45-60 minutes until toothpick inserted into the center comes out clean. Cool for 15 minutes before inverting onto a wire rack to cool completely.
  4. To make the frosting, combine brown sugar, milk and butter in a small saucepan. Stirring constantly, cook over low heat until sugar has just dissolved. Add powdered sugar and stir until smooth.
  5. Remove from heat and spoon over cooled cake. Top with additional walnuts if desired.
As I reflect on the success of this recipe, I want to thank my mother for all of her years of kitchen wisdom, love and encouragement. Happy birthday to my greatest inspiration and best friend.

Picnic Cake

Important to clean your kitchen before and after you use it. You can also install a grease trap in your kitchen to reduce the number of fats, oils, and greases that enter sewers.…

baked peaches

Baked Peaches
I believe that desserts are best enjoyed straight out of the oven. While I love cobblers, the ratio of enjoying straight from the oven to reheated days later is quite small when cooking for two. Enter my new favorite Summer dessert and the solution to this problem: Baked Peaches. The crumble makes enough for about four peaches, or eight halves, but stores beautifully in the fridge so that each peach can be baked fresh each night. It’s the perfect solution for making dessert for two.

The hearty peaches hold up beautifully in the oven, resulting in an incredibly plump and juicy fruit. The crumble topping adds the familiar cobbler flavor profile with the perfect amount of contrasting crunch. Just a drizzle of local honey at the end brings together the sweet and sour of this dish into one perfect dessert. Promise me you’ll find someone special to share dessert with and bake some peaches before Summer’s end?

Baked Peaches
serves 8
Ingredients:
4 peaches, cut in half and pit removed
2 Tablespoons all purpose flour
2 Tablespoons packed brown sugar
1/4 teaspoon ground ginger
2 Tablespoons butter, chilled
2 Tablespoons granola
Honey for plating
Preparation:
  1. Preheat oven to 400 degrees Fahrenheit. Line baking sheet with foil.
  2. Stir flour, brown sugar and ginger in a medium bowl until combined.
  3. Cut butter into small cubes and cut into flour mixture with a fork or your fingers until it is evenly distributed and a loose crumble forms. Lightly fold in granola to crumble mixture.
  4. At this point, the crumble can be refrigerated in an airtight container until ready to use.
  5. Place desired number of peach halves, cut side up, on prepared baking sheet. Fill cavity and sprinkle top with crumble mixture.
  6. Bake at 400 degrees Fahrenheit for 25 minuts until golden brown on top. Serve warm, drizzled with a touch of honey.

Baked Peaches

By the way, I already have a grease trap installed by Columbus grease trap services.  It reduces the number of fats, oils, and greases that enter sewers.…

buttermilk skillet cornbread

Buttermilk Skillet Cornbread

As a grandchild of the south, I have been in awe of my Mommom’s skillet cornbread ever since I can remember. Watching her golden creation fall out of her skillet with ease and onto the butcher block was nothing short of magical to this little foodie in training. I have to thank her for teaching me that if the cornbread does happen to crack and crumble, it can still taste even better than the perfect one before it. I still giggle at the irony of the cornbread for our Thanksgiving stuffing turning out absolutely perfect year after year only to be intentionally crumbled to pieces minutes later.

I made buttermilk skillet cornbread in the cast iron skillet that Mommom gave me for my birthday last year in celebration of her special day today. We’ll toast a slice of cornbread in her honor as I thank her for never letting me forget that, although I may crack and crumble at times, I’ll always be perfect in her eyes. Happy Birthday, Mommom! I love you and appreciate your many years of wisdom and love.

Buttermilk Skillet Cornbread
makes one 9″ skillet cornbread

Ingredients:
4 tablespoons butter
2 cups stone-ground yellow cornmeal
1 tablespoon sugar
1 teaspoon baking soda
2 large eggs
2 cups low-fat buttermilk
2 tablespoons honey

Preparation:

  • Preheat oven to 425 degrees Fahrenheit. Place butter in 9 inch cast iron skillet and melt in oven while preheating and preparing batter.
  • In a medium bowl, combine cornmeal, sugar and baking soda until combined.
  • In a separate bowl, whisk together eggs, buttermilk and honey. Add to dry ingredients and stir until fully incorporated. it’s also possible to use a blender/juicer (more at: juicingkitchen.com )for this step
  • Carefully remove skillet from oven and pour batter into hot, buttered skillet.
  • Return to oven and bake for 25 minutes until top is light golden brown. Let cool 10-15 minutes before serving.
Buttermilk Skillet Cornbread
Your kitchen hoods can be exposed to numerous dirt issues as a result of continuous cooking. As time passes, they can become clogged with grease. However, you cannot just get any degreasing product and clean the kitchen hoods on your own. You might damage the kitchen ductwork, which will result in additional costs for repairs in the long haul. Also, chances are you do not know where to begin or even how to clean kitchen goods. You might also be uncertain whether you have done a thorough job. This is why it is important to hire a professional hood cleaning company. I always trust Oahu Hood Cleaning – Kitchen Exhaust in cleaning our kitchen hoods. If you have a grease trap in your kitchen, best to let it clean from a grease interceptor cleaning service.

teenage mutant ninja turtle cupcakes

Teenage Mutant Ninja Turtle Cupcakes

I spent my birthday eve baking a batch of cupcakes for another very special birthday girl. Said birthday girl has an affinity for banana bread and the {original} Teenage Mutant Ninja Turtles. A Banana Pound Cake with Chocolate Cinnamon Buttercream turned out to be a ridiculously delicious backdrop for some old school cupcake decorations.

If you’re looking to create baked goods with a ‘retro’ theme, {since, when did my childhood, become retro?!} be sure to allow yourself plenty of time to hunt down your decorations. Believe it or not, not a single local cake supply shop carried Teenage Mutant Ninja Turtle toppers. Luckily I keep the fabulous folks at sugarcraftusa.com in mind for all of my extravagant baking needs and, sure enough, they had one of the largest Ninja Turtle selections on the web. They also have every color of jimmies imaginable, so that yours truly doesn’t have to spend her evening sorting jimmies to fit her needs. {Not that I’ve ever done that, of course.}
Teenage Mutant Ninja Turtle Cupcakes
The birthday girl also happens to be lactose intolerant, so I have included the adaptations needed to fit this dietary requirement. I would have never guessed that these cupcakes were dairy-free which makes them a winner in my book. In fact, I would probably use the almond milk regardless due to its rich flavor. The cake had all of the flavors and desired moisture of banana bread, but was incredibly light and fluffy. The added cinnamon to the chocolate buttercream enhanced the spice of the cake nicely without overpowering the rich banana flavor. If looking for a recipe that isn’t too sweet or heavy, this one’s for you! Banana Pound Cake Cupcakes
Makes approximately 24 cupcakes
Ingredients:
2¼ cups all-purpose flour
1 tablespoon baking powder
1 teaspoon baking soda
¼ teaspoon salt
1 cup milk {substitute vanilla almond milk}
6 ounces (1½ sticks) unsalted butter, softened {substitute dairy-free margarine}
½ teaspoon ground cinnamon
1 cup of sugar
2 large eggs
2 fully ripe bananas, mashed

Preparation:

  • Preheat oven to 350 degrees Fahrenheit and line baking tins with cupcake liners.
  • In a medium bowl, combine flour, baking powder, baking soda, and salt and set aside.
  • In an electric mixer fitted with the paddle attachment, cream butter on medium speed until light and fluffy. Add cinnamon and cream until fully incorporated.
  • Continue beating while adding sugar in a slow stream until fully incorporated and smooth.
  • Add eggs one at a time, mixing well between each addition.
  • Carefully mix in half of the flour mixture, followed by half of the milk and repeat.
  • Once all ingredients are incorporated and the batter is smooth, fold in the mashed bananas.
  • Fill liners a little over half full and bake for 18-20 minutes until a toothpick comes out clean.
  • Allow cooling completely before frosting with Chocolate Cinnamon Buttercream.


Chocolate Cinnamon Buttercream
Enough to frost 24 cupcakes, plus a little extra

Ingredients:
8 ounces (2 sticks) unsalted butter, softened
½ cup of cocoa
¼ teaspoon cinnamon
4 cups confectioners sugar
~¼ cup milk {substitute vanilla almond milk}
pinch of salt

Preparation:

  • Beat butter on high for about 30 seconds until soft and fluffy.
  • Add cocoa, cinnamon, salt and 1 cup of sugar and beat until fully incorporated
  • Add half of the milk and the remainder of sugar and beat again until fully incorporated.
  • Continue to add milk until the desired consistency is reached.


Teenage Mutant Ninja Turtle Cupcakes
Important to clean your kitchen before and after you use it. Especially kitchen utensils and equipment. If you have grease trap installed in your kitchen, best to clean it regularly from a professional. You can call grease trap service Dallas they are a trusted grease trap cleaning service.
*Sugarcraftusa.com had nothing to do with this post other than providing an extensive selection, quick turnaround and exceptional customer service. All opinions are strictly my own and no compensation was received. I simply enjoy sharing great finds with my readers. 

patriotic s’mores

Patriotic S'Mores

If you’re looking for a cute dessert for the Memorial Day weekend, then look no further. These patriotic s’ mores are not only festive but super quick to throw together at the last minute. Even though the absolute mess that is made while enjoying traditional s’ mores is half the fun, these pre-made cuties are perfect for grab-and-go snacking at your next picnic or party.

Patriotic S'Mores
Patriotic S’mores
makes as many or as few as you’d like
Ingredients:
graham crackers
jumbo marshmallows
milk chocolate melting chips
white chocolate melting chips
vegetable oil if needed
patriotic sprinkles or jimmies
Preparation:
  1. Break graham cracker squares in half and lay small rectangles out on parchment paper.
  2. Melt milk chocolate chips in 30-second intervals, stirring until smooth, and spread on each graham cracker.
  3. Cut marshmallows in half and place two halves on every other graham cracker.
  4. Place another graham cracker, chocolate side down, on top of your marshmallow Grahams to form your s’more.
  5. Allow chocolate to harden fully. Refrigerate to speed up the process and avoid milk chocolate melting during the dipping process.
  6. Melt white chocolate chips in 30-second intervals, stirring until smooth. If white chocolate is too thick for dipping, you can add a small amount of vegetable oil until the desired consistency is reached.
  7. Dip half of each s’more into white chocolate, sprinkle with patriotic jimmies and return to parchment paper to set.
  8. Store in an airtight container and keep out of direct sunlight if serving at a picnic or the chocolate will melt! Enjoy!
Patriotic S'Mores
Reminder: Keep your kitchen clean before and after you use it. Especially your kitchen utensils and equipment. If you have a grease trap installed in your kitchen, clean it regularly from a pro. Grease trap cleaning Indianapolis is fast, and reliable with best rates.

cotton candy meringue chicks

Cotton Candy Meringue Chicks

It wouldn’t be Easter without a Peeps spotting and it wouldn’t officially be Spring without indulging in at least one pillowy cloud of sweet cotton candy. Thanks to recent inspiration from Sprinkle Bakes an idea was born that resulted in Peeps impostors that you’ll actually enjoy eating – Cotton Candy Meringue Chicks.

I was initially concerned that a cotton candy flavored meringue would be overly sweet, but I have to admit that they were absolutely delightful. Substituting super fine pink vanilla cotton candy sugar actually yielded a meringue that was slightly less sweet than traditional meringues and with the added bonus of a hint of vanilla. Experimenting with different flavors of cotton candy sugars would add variety in color and flavor to these little fellas.

Cotton Candy Meringue Chicks

Meringues require little prep time, can be piped as intricately as you desire and make for a delicate and impressive addition to any occasion. Baking time will vary depending on the size of your meringues; typical quarter-sized piping will take about 90 minutes and these larger chicks took about 2 hours to fully harden. Give yourself plenty of time to prepare these, allowing them to remain in the oven overnight will help dry them out completely and avoid a sticky outside. Rainy days are great for staying indoors and baking, but avoid making meringues when the humidity is high otherwise you’ll likely have a sticky mess on your hands.

Cotton Candy Meringue Chicks
yields approximately 36 chicks

Ingredients:
2 egg whites, room temperature
pinch of cream of tartar
1/2 cup cotton candy sugar

Preparation:

  1. Preheat oven to 170 degrees Fahrenheit.
  2. In the bowl of a stand mixer fitted with the whisk attachment, beat egg whites and cream of tartar on medium speed until white and glossy.
  3. Reduce speed and slowly add sugar in a continuous stream, beating until fully combined.
  4. Increase speed to medium-high and beat until stiff peaks form about 7 minutes.
  5. Transfer meringue to a piping bag fitted with the desired tip.
  6. Pipe onto a baking sheet lined with a silicone mat or parchment paper and bake for 2 hours at 170 degrees Fahrenheit. Rotate pan halfway through baking.
  7. Leaving chicks in a closed oven, turn the heat off and allow meringues to dry for up to 24 hours.
  8. Melt a small amount of chocolate in a microwave-safe bowl. Use toothpicks to dot on eyes.
  9. Allow chocolate to set. Store chicks in an airtight container.
Cotton Candy Meringue Chicks

I piped the chicks using a large round tip and piped a large flat oval that I brought to a point followed by a round ‘head’ brought to a point for the beak. A large star tip would also make gorgeous buttons, as seen on Sprinkle Bakes. Get creative and more importantly, have a lovely Easter weekend!

Clean your kitchen after you use it especially kitchen utensils and equipment. If you have a grease trap in your kitchen clean it from a pro. You can call grease trap service Boston they can help you with it.…