valentine petits fours

Valentine Petits Fours
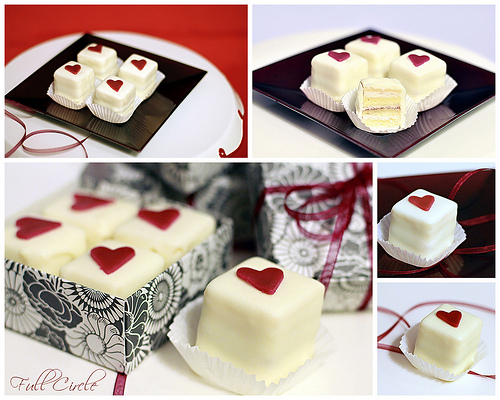
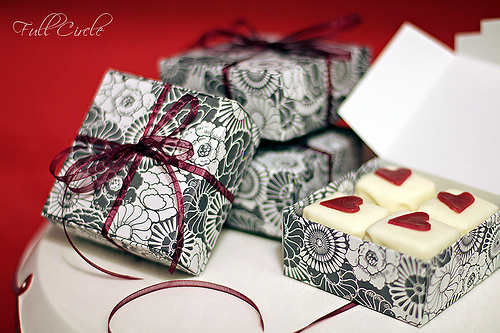
Since nothing says ‘I love you’ like gourmet confections and because I had recently added petits fours to my arsenal of baking knowledge, I decided that this year’s Valentine’s treat would be white chocolate raspberry petits fours. This endeavor took up the majority of my weekend between baking and freezing and assembling and freezing and dipping and decorating and well, you get the picture. Time consuming or not, I’d make these little cubes of love ten times over. Their gorgeous presentation and undeniable deliciousness is worth the effort.

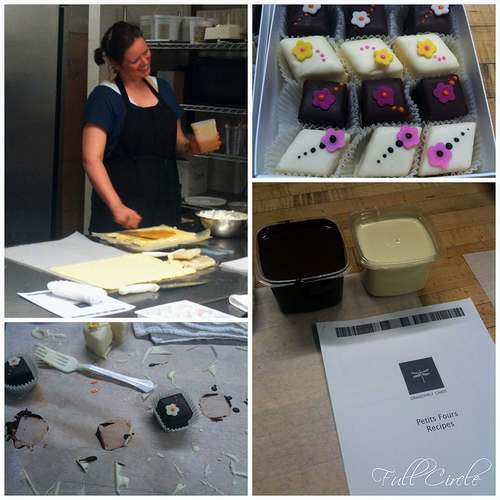
Petits Fours require careful planning in order to maintain one’s sanity during their assembly. This is not a task that you want to undertake the day before your special event. What is great about this recipe is that each component can be prepared well in advance so your final dipping and decorating can be easily completed the day before or day of your special event.

Valentine Petits Fours

What you’ll need:

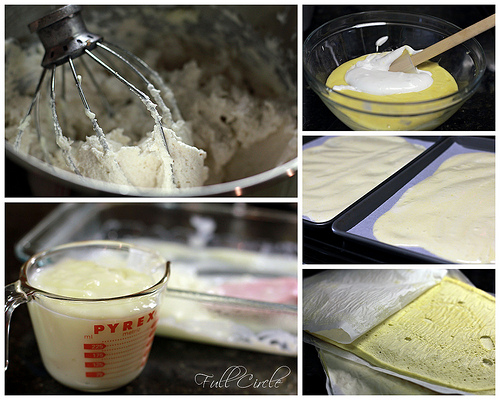
  • Chiffon Cake; baked in layers of about 1/4 inch thick for approximately 5 minutes {easy trick – line baking sheet with parchment paper sprayed with cooking oil, pour batter, top with second sheet of parchment paper sprayed with cooking oil – freeze until ready to use to make removing parchment a snap}
  • Simple Syrup
  • Buttercream {recipe for amazing milk custard buttercream to follow}
  • High quality, seedless preserves/jam
  • Marzipan; rolled thin so that you can read a newspaper through it
  • Chocolate melts; mixed with enough high quality unflavored oil to reach desired dipping consistency
Valentine Petits Fours

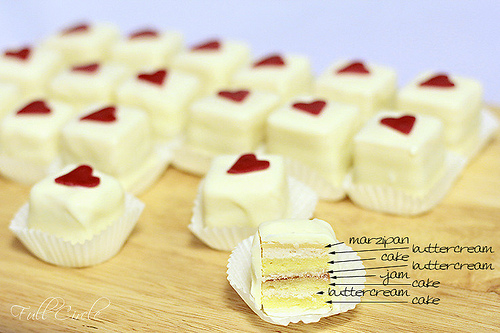
Petits Fours Assembly: Layering from the bottom up

  • Cake brushed with simple syrup
  • Thin layer of buttercream
  • Cake brushed with simple syrup
  • Thin layer of jam
  • Thin layer of buttercream
  • Cake brushed with simple syrup
  • Thin layer of buttercream
  • Marzipan
Valentine Petits Fours
  • Freeze overnight, leaving the unsightly edges in tact to preserve cake.
  • Using a hot knife, trim edges and cut to desired shapes.
  • Return to freezer until ready to dip.
  • Dip in prepared chocolate melts and transfer to parchment paper; chocolate will set quickly thanks to the frozen cake.
  • Trim excess chocolate ‘foot’ with sharp knife.
  • Place in small baking cups to avoid fingerprints when picking up.
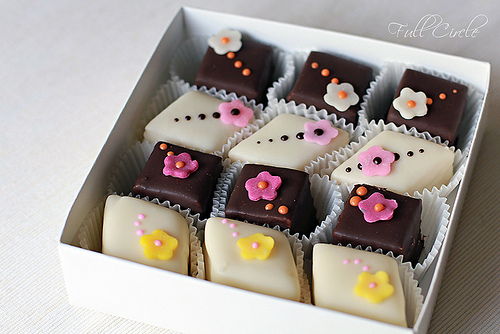
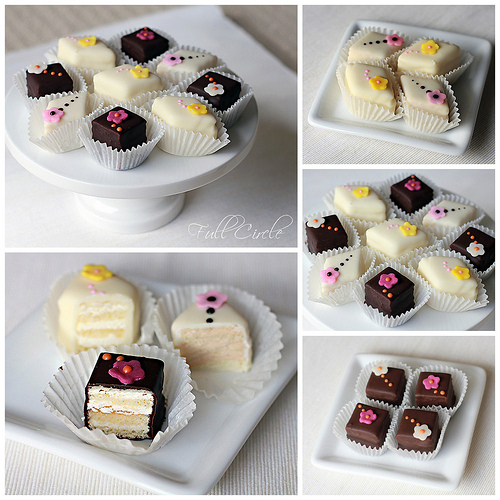
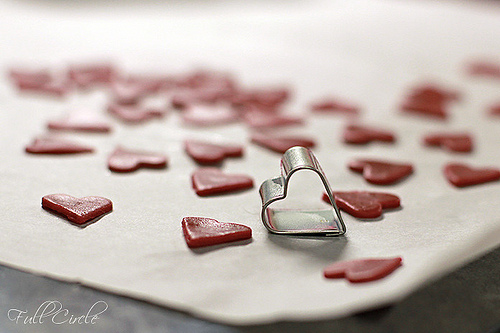
  • Decorate with marzipan, chocolate gum paste or piped chocolate.
  • Share with loved ones!

Valentine Petits Fours

Milk Custard Buttercream Recipe
Custard Ingredients:
12 ounces + 4 ounces sugar
4 cups whole milk
2 ounces corn starch
 
Custard Preparation: makes 5 cups
Put 12 ounces sugar in pan on stove with milk; stir well.
Combine 4 ounces sugar in bowl with corn starch.
Heat milk mixture on high until it comes to boil; stir occasionally.
When milk mixture gets warm, add 3/4 cups to corn starch mixture; make a slurry.
As milk comes to a boil, whisk in corn starch mixture.
Whisk mixture over heat until it thickens.
Pour onto sheet pan and store in refrigerator until cool.
 
Buttercream Ingredients:
12 ounces (3 sticks) butter
1 1/4 cup custard
Optional: 2 ounces of chocolate OR 1.5 ounces preserves OR 3 Tbsp vanilla
 
Buttercream Preparation:
Soften butter and whip on high with whisk attachment.
Once butter has significant volume, add custard slowly.
Add desired flavor.

Valentine Petits Fours

petits fours class at dragonfly cakes

Petits Fours Class at Dragonfly Cakes

Look at these gorgeous petits fours! I’m still in complete awe that I made these. Okay, okay. Dragonfly Cakes made them, but I dipped and decorated them. Thanks to Groupon and the lovely Momster, I attended a class on how to make petits fours: Groupon for the half off coupon and the Momster because of her “I’ll pay for cooking classes if you send me the recipes and tips” rule. Both are pretty sweet deals if you ask me.
 Petits Fours Class at Dragonfly Cakes
The petits fours class was held in Sausalito in the commercial kitchen of Dragonfly Cakes. The instructor was as knowledgeable as she was charming, just as the petits fours were as delicious as they were adorable. The class started off with a start to finish demonstration of constructing the cake, buttercream, jam and marzipan layers. Tips for success were given throughout and Dragonfly Cakes was kind enough to share their absolutely amazing recipes with the participants.
Once the cakes were constructed, a quick demo on dipping and decorating was given before participants were let loose to put the finishing touches on their own tiny treats. I’m still amazed that we were given so many petits fours to practice on. When all was said and done, each participant took home two boxes {roughly two dozen!} of their hand dipped and decorated petits fours.

Petits Fours Class at Dragonfly Cakes

If you are in the Bay Area, I highly recommend signing up for one of the many petits fours classes that Dragonfly Cakes has to offer. Their pastry chefs/instructors are extremely knowledgable, their recipes are worth their weight in gold and you’re guaranteed to have a sweet time. These classes would also make a fun gift to enjoy with the ladies in your life: bridal parties, best friends and, of course, Moms.
If you are not in the Bay Area, you can still indulge in these tiny sweets by ordering Dragonfly Cakes online. Petits fours collections are available for any occasion and custom orders are also welcome. Do yourself a favor and sweeten your next event with petits fours from Dragonfly Cakes!

stir-n-drop sugar cookies

I was recently inspired to get out my great grandmother’s cookbook and explore the numerous recipes of our family’s past generations. When my great grandmother passed away, my aunt and grandfather took the time to type out the recipes of her recipe box into a cookbook that was shared throughout our family and friends.

I had previously made quite a few recipes by seeking out the familiar dishes that I grew up with, but it wasn’t until recently that I began adventuring into unknown recipes. I believe that you achieve a great connection with someone by sharing a meal or time in their kitchen. This adventure through the pages of our family’s cookbook has allowed me to connect with my family in a very special way. Thanks to the hard work of my aunt, it’s as if I’m sharing a meal with my great grandmother in present day.

Stir-N-Drop Sugar Cookies
Staying true to our family, I started with dessert first. =) These Stir-N-Drop Sugar Cookies were a unique treat, unlike any modern sugar cookie recipe that I have encountered. They turned out very similar to a cupcake top and although they were lovely as is, I thought a little icing couldn’t hurt. I dipped the finished cookies in a simple lemon juice/confectioner’s sugar glaze for an absolutely delicious creation.
Stir-N-Drop Sugar Cookies
Ingredients:
2 eggs
2/3 cup oil
2 tsp vanilla
1 tsp grated lemon rind
3/4 cup sugar
2 cups sifted flour
2 tsp baking powder
1/2 tsp salt
Stir-N-Drop Sugar Cookies

Preparation:

Heat oven to 400 degrees. Beat eggs until well blended. Stir in oil, vanilla and lemon rind. Blend in sugar until mixture thickens. Sift together flour, baking powder and salt; add to egg mixture. (Dough will be soft). Drop by teaspoonfuls about 2 inches apart on ungreased cookie sheet. Stamp each cookie flat with bottom of glass dipped in sugar. (Lightly oil glass, dip in sugar…continue dipping in sugar). Bake 8-10 minutes. Remove immediately.
Stir-N-Drop Sugar Cookies

my first attempt at challah

Shortly after Christmas, I found myself craving challah. What’s wrong with that statement? Absolutely nothing. Don’t forget, we are the family who enjoys a post Christmas Dinner dinner at the local Jewish Deli every year.

I told my mother that I must have been Jewish in a former life due to my insane love for the Jewish culinary culture. She claims I got it from her genes since all of her friends growing up were Jewish and she enjoyed dinner at their homes quite often. There’s nothing scientific to either argument, but we’ll just roll with it.

First attempt at Challah

Back to challah. I love challah. So much, in fact, that when I was living in Dallas I would pick up a loaf at least once a week at Whole Foods. Had I known that it was so easy to make, I could have saved a good chunk of money by making it at home. Now I know, but now I have to be careful not to quadruple my carb intake because it is so easy to make at home. And delicious, ridiculously delicious.

First attempt at Challah
the distinctive crumb that separates challah from bread

A big thank you to the Baking Barrister for steering me in the direction of her favorite Challah recipe – it tasted exactly like my favorite style of challah from Whole Foods. Another thanks goes out to Tamar Ansh for this great tutorial on how to weave a round loaf. I have to admit that my first attempt at challah came out near perfect thanks to the input of these ladies!

Challah
recipe from Fine Cooking

Ingredients:
2 tsp. instant yeast (Red Star Quick Rise, SAF Perfect Rise, Fleischmann’s Rapid Rise or Fleischmann’s Bread Machine Yeast)
16-3/4 oz. (3-1/2 cups) unbleached all-purpose flour (Hecker’s, Gold Medal, or Pillsbury); more as needed
1/4 cup warm water
3 large eggs
1/4 cup vegetable oil
1/4 cup honey
1-1/2 tsp. table salt
For the glaze:
1 egg, lightly beaten
Sesame or poppy seeds for sprinkling (optional)

Preparation:
In a large bowl, mix the yeast with 1/2 cup of the flour. Add the warm water, stir, and let this mixture, called a sponge, sit until it starts to puff up, 15-to 20-minutes. Add the eggs, oil, honey, and salt; stir until well combined. The sponge will remain lumpy—this is fine. Add the remaining flour and mix the dough in the bowl until all the ingredients are combined. Turn the dough out onto a work surface and knead until fairly smooth, about 2 minutes. The dough should feel very firm and will be hard to knead. If it’s soft and sticky, add more flour until it’s very firm. Transfer the dough to a large, clean container and cover it well. Let it rise until doubled in bulk and very soft to the touch, about 2 hours, depending on the room temperature. Line an insulated baking sheet with parchment or oiled foil. If you don’t have an insulated sheet, stack two sheets together (this keeps the bottom of the bread from overbrowning during baking).

First attempt at Challah

To shape the dough:
Turn the dough out onto a lightly floured work surface and sprinkle a little more flour over it. Spread and flatten the dough a bit, but don’t worry about punching it down. Cut it into three to six equal pieces, depending on your desired braiding pattern. Set aside the dough pieces, cover them lightly with plastic, and brush all the flour off the work surface. Have a small bowl of water handy. Using no flour, roll a piece of dough with a rolling pin into a very thin sheet, between 1/8 and 1/4 inch thick (don’t worry about making a rectangle; an amoeba-type shape is fine). The dough may stick to the work surface; this is all right—just nudge it gently with a dough scraper. Tightly roll up the sheet like a carpet to form a strand. Roll the strand back and forth between your hands until it’s thin, very even, and 12 to 15 inches long. Braid into desired loaf shape.

First attempt at Challah
I used the braiding tutorial found here at Chabad.org 

Transfer the braid to the lined baking sheet and cover it loosely but thoroughly with plastic wrap. Let proof until doubled in bulk and the loaf remains indented when lightly pressed, about 2 hours, depending on room temperature. (If in doubt, let the dough proof more rather than less.)

To bake:
Position an oven rack in the lower third of the oven and heat the oven to 325°F. Just before baking, brush the dough with the beaten egg. Sprinkle with sesame seeds or poppy seeds, if using. With a thin wooden skewer, poke the bread deeply all over (the holes will prevent air pockets and help the bread keep its shape during baking). Bake for 20 minutes. Rotate the challah 180 degrees and bake until the bread is a dark, burnished brown, about another 15 minutes. (If the challah is browning too rapidly cover it loosely with foil and let it finish baking. Don’t remove the loaf too soon, as you’ll risk underbaking.) Let cool thoroughly on a rack.

First attempt at Challah

crock pot puttanesca

Not too long ago I was having a serious craving for puttanesca. I was also feeling pretty lazy, so a crock pot recipe was a must. I failed to find a recipe that I was 100% sold on, but I succeeded in creating a delicious recipe of my own. Zach’s only complaint was that it tasted like olives, but since that’s what puttanesca essentially is, I’ll take it as a compliment! If you love the flavors of traditional puttanesca, but don’t want to slave over a hot stove all day then this recipe is for you.
Crock Pot Puttanesca
Ingredients:
1 lb boneless, skinless chicken breasts, cut into 1 inch cubes
1/2 cup kalamata olives, pitted and sliced
1 pint mushrooms, cleaned and sliced
3 Tablespoons capers
1 Tablespoon minced garlic
1 Tablespoon red pepper flakes
1 can fire roasted tomatoes
1 can petite diced tomatoes
Preparation:
Place chicken in bottom of crock pot and top with remaining ingredients. Cook on low for eight hours. Serve over pasta of choice and enjoy!

batter bakery

It just so happens that there is a bakery kiosk right next to where I transfer bus lines on my morning commute. And it just so happens that they sell homemade shortbread and cupcake selections. And it just so happened that the cupcake I picked up on my way to work last week was ah-mazing.

Said kiosk is named Batter Bakery and is located at 555 California Street in San Francisco.
I picked up a chocolate cupcake with cinnamon cream cheese frosting and it was a delightful as it sounds. So good, in fact, that I will be making a stop at this kiosk on Friday mornings to reward myself for making it through the week. (Hey, at least I’m only going once a week! And I have a deal that I can only stop if I’m up and out the door in time to make the earlier bus, which is quite a feat by the time Friday rolls around!)
At $3 a pop for a very conservative regular sized cupcake, these are definitely a special treat, but special they are. The cake was oh so moist, especially for not having a kitchen on site, and the frosting, well it was just to die for. They only offered one flavor of cupcake that day, I’m not sure if it was because it was Friday, or if it’s a flavor of the day sort of deal. Either way, I plan on making it through their menu of cupcakes and shortbread. They all sound amazing!